
Crop Board Button
by Joe Holler
View Videos
There are 4 ways to make a rectagular crop selection:
-
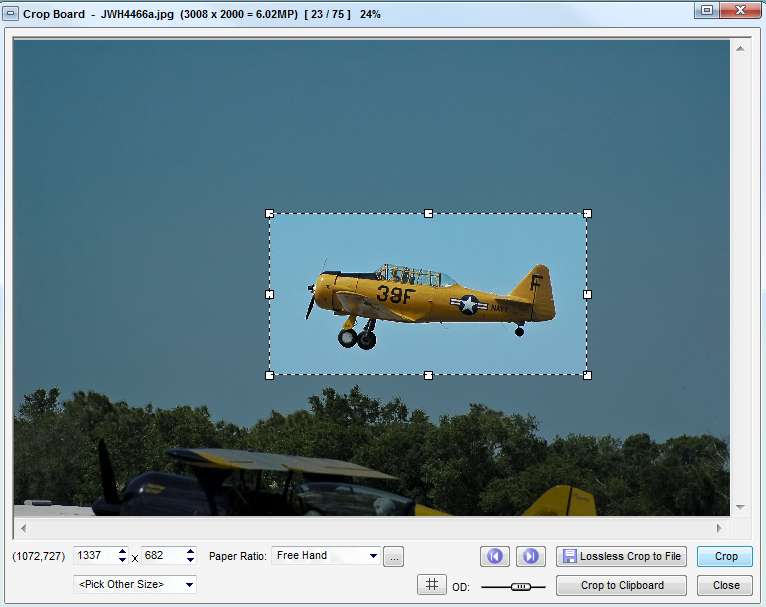
To make a selection of any size that you think looks good, first set the paper ratio to "Free Hand":

Left click on one corner of the box you want to select, and without releasing the button drag diagonally to the opposite corner.
The selected area can be repositioned by clicking inside the selection and dragging the rectangle around. You can also resize it by grabbing any side or corner and streching or shrinking the selection.
- Enter the dimensions in the width and height boxes by typing the numbers or using the up and down arrows.

-
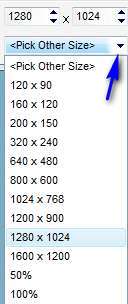
Click on a size from the "Pick Other Size" drop down menu.
-
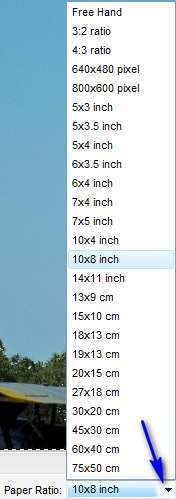
After the free-hand technique, the next most useful is a selection with a fixed aspect ratio. It's just like Free Hand, but the selection always keeps a specified shape. For example, with 3:2 ratio the selection box is always two-thirds as high as wide (or vice-versa). First pick a size or ratio from the "Print Ratio" drop down menu:
 There's almost no difference between a size in inches and an equivalent ratio. For example, requesting a 6x4 inch crop is basically the same as one with a 3:2 ratio.
Paper ratios can be added, removed, edited, or change their position in the menu by clicking on the ellipsis  to get the "Paper Ratio Settings" dialog box:
 [Hi, Wren here with more details than you probably want to know, but in case you're interested ... Personally I select each of the sizes specified in cm and use the Remove button to make the list shorter, since I don't work in cm.
Most Digital SLR cameras create images with an aspect ratio close to 3:2 and cropping with that ratio will give you an image that matches (the width to height) close enough to your original images for most purposes. However, sometimes I want all my images to exactly match in size after I reduced them to a constant width. Therefore, I'll also add ratios which exactly match those of images from my camera, for example, one of my cameras shoots images which are 4288 x 2848 so I'll add a crop ratio of 134:89 and use it instead.
And now for the difference between a 6x4 inch crop and a 3:2 crop. To work with round numbers, let's say you have an 8+ Mpix camera which produces images that are 3600 x 2400 and in the EXIF it says the image is 300 dpi. Let's say you crop out an area which is 3000 x 2000 and save it. If you used a 3:2 crop the EXIF info would still say it was 300 dpi and if you looked at the image info in Photoshop it would say it was 10 x 6.67 inches. If you used a 6x4 inch crop instead, the image you saved would still be 3000 x 2000 pixels, but the dpi would have changed to 500 and if you looked at the image info in Photoshop, Photoshop would claim the image is 6 x 4 inches.
Personally I disagree with any workflow that tells you to mess around with image size, especially those that have you upsample before printing. These all came from a theory that you were matching your image to the dpi of the printer, but you're not really. Most of these workflows have you setting the size (in inches) you want to print, and then changing your your dpi to 300 or 360, and potentially upsampling so you have the right number of pixels for your printer, but that doesn't really match your printer. Today good inkjet printers claim to print at 5760 x 1440 "optimized dpi" (and obviously they're not dots since they're four times as big in one direction as the other). They don't really print dots at all, instead the spray dropplets of ink that are only 1.5 picoliters (a picoleter is 1/1,000,000,000,000 of a liter). Only the printer driver, or software that works closely with the printer driver really knows what's going on.
I agree that final sharpening should be done at the resolution of the print, but that's why I let Qimage do it ... I know it works closely with the printer driver and sharpens correctly for a given driver and driver settings. Some images need additional sharpening and I'll do that first in Photoshop.)
Bottom Line: I don't care what dpi my images have, I only care that the width and height has the right ratio and that there are enough pixels to produce a good quality print. In other words, for me there is no difference between a 7:5 ratio crop and a 7x5 inch crop, the total number of pixels is the same either way.]
To change from portrait to landscape or vice-versa, click the "Flip Ratio" check box.
To go to the previous or next image in the current folder click the left or right button. 
[Note: By default the FastStone Crop Board automatically advances to the next image after you make the crop, in Settings you can change the behavior and make Crop Board close after a Crop.]
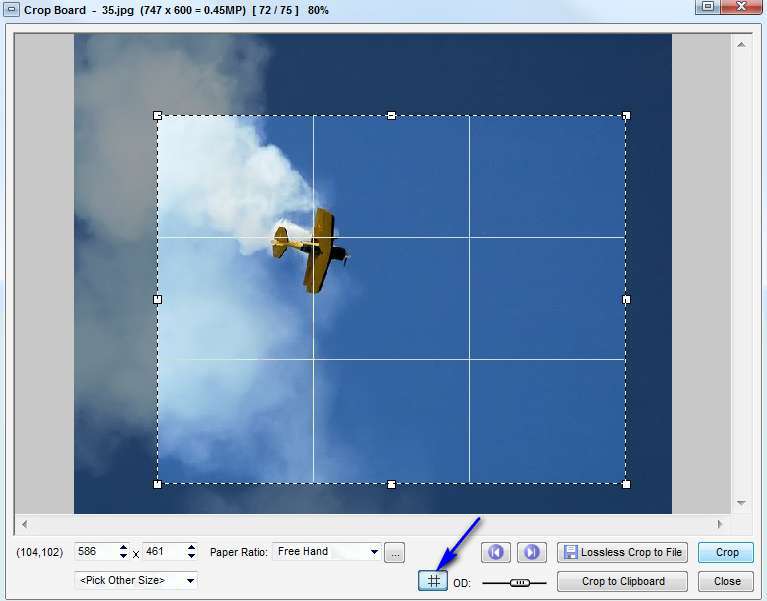
To insert Rule of Thirds guidelines into he slected are, click  .
.
Use the Outer Darkness (OD) slider to make the part of the image outside of the crop lighter or darker. (This has nothing to do with the crop, it just helps you better visualize what the result will look like.)

To deselect a crop area hold the control key down and hit D.
Whenever an image is saved as a JPG file, it is compressed (to make he file size smaller) resulting some loss of guality, which is usually not noticeable. In order to save the crop without re-compressing, click  and a "Save As" dialog window will open. "_cr" will be added to the end of original file name. It can accepted, or changed in the "Object Name" box.
[Note: In order to do a Lossless Crop, FastStone can only start the crop at certain pixel multiples. Normally this isn't an issue, if the upper left corner moves a few pixels, it usually doesn't matter. However if you're trying to crop an exact number of pixels off the top or left side of an image you can't do it using Lossless Crop, instead use the  button and the crop will start exactly where you want it to.]
Click  , if you intend to paste the crop somewhere, like a document or email.
Clicking . will crop the image and remain in full-screen view. The cropped image has not been saved yet. To save it, hold the control key down and hit S, or move the cursor to the lower left corner of the screen and on the Tool Bar click the save icon  . In either case, a "Save As" dialog window will open.
Click  or hitting Escape to close the crop board without cropping.
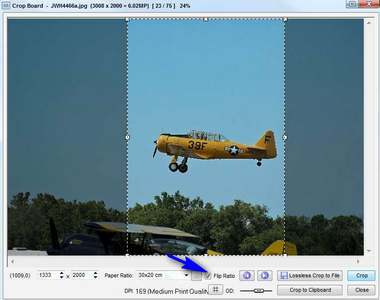
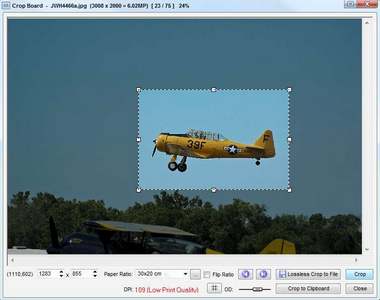
Tips: When cropping a small area out of a large image, it's hard to make an accurate selection. The first suggestion is to maximize the Crop Board (icon in upper right):
Then use the standard shortcut to zoom (Ctrl + Plus Sign). In this case I had to repeat several times to really zoom in on the area I wanted to crop. I also needed to use the scroll bars to position the area I was cropping back on the Crop Board:

Also note how I moved the Outer Darkness slider (bottom arrow above) to the left making it easier to focus on what will remain after the crop. (Sliding it all the way to the left, makes the outer area black; sliding it all the way to the right doesn't darken it at all.)
Now it was easy to: (1) grab the crop box in the center and position the upper left corner where I wanted it, and (2) grab the lower right corner and drag until overall size of the crop box was exactly correct:
Suggested next choices:
ImagingTips.com Site Map

[an error occurred while processing this directive]