
After reviewing, click for a two page Summary of the Backup Steps you can print.
In my discussion of Complete System Backup I recommended using a stand-alone program that creates a complete backup of your C drive which can be easily restored to a newly formatted hard drive when your C drive fails or becomes hopelessly corrupted by a virus. You notice I said WHEN, not IF, because sooner or later it's going to happen to you.
One program I can recommend is Paragon Hard Disk Manager. Versions of Paragon after 2010 are easier to use and backup faster. I also tried Clonezilla, which is free but I think the user interface is too difficult for most users. The reason I like both of these is that they can run stand-alone. There are lots of system backup programs that run under windows, but if Windows is running other processes are scribbling on hard drive and there's a very real chance they can corrupt the backup, which you'll never know until you try to restore and it's too late! ... It happened to me more than once while testing various backup programs, you restore what claimed to be a successful backup to a new drive and it either will not boot, or will not run properly after booting.
As I said, be sure to use the stand-alone version of Paragon. This is what they called the WinPE based Recovery Media. In the past they sent you two links when you bought Paragon. One to download the Windows product, and a second to a program that creates the Recovery Media. Be sure to create the Media! You'll need it should you ever need to restore a backup, but it is the program I recommend using to create your complete system backup.
Starting with about the 2014 version, they only send you a link to download one program. Start this program and use it to create the bootable recovery media. I now recommend saving it as an ISO file, and then using a program called ISO2USB to create a bootable USB flash drive ... the advantage is that it loads MUCH faster than a CD, alternatively, you can also make a bootable CD from the ISO file.
Recommendation 1: Before starting be sure there is a folder at the top level of EACH of your drives that uniquely identifies the drive. Name this folder so it sorts near the top (I usually start the name with a # sign). Create a folder like this on both your external backup drives and any drives internal to your system. I now label my external drives with different colors it easy to tell them apart at a glance, see Labelling Your External Drives. On my internal drives I create a folder with a name like #Name-D2TB (where Name is the name of the machine, D is the drive letter and I follow this by the size of the drive ... but don't use something like 1.5T to indicate a one and a half TB drive ... some programs, can't deal with the period in the folder name).
Recommendation 2: Name the archive based on the name of the computer and the date of the backup. For example, one of my desktop computers is named "Wings", so to backup its C drive I might name the archive "Wings-C150124" (dates in the YYMMDD format sort correctly alphabetically). This new version of Paragon automatically creates a folder for the archive based on the name of the archive.
Recommendation 3: Before starting your backup, consider deleting all your system protection restore points. This will make the size of the archive smaller, but since you'll loose all your currect backup points, only do this if your system is running OK. See System Protection and Deleting Shadow Copies for more infomation.
Many have trouble booting from the stand-alone CD or bootable USB flashdrive. It may require changing the CMOS settings, or figuring out the trick to get your particular machine to boot from other than your harddrive. Each machine is different, so get someone to show you how to boot your machine from the recovery media and write down the steps.
Put the stand-alone CD in your CD drive (or bootable flashdrive in a USB port) and reboot your system. Assuming you're going to backup to an external hard drive, make sure it's attached and running before rebooting. If your machines boots from the CD you'll see the screens below. If it doesn't boot from the CD, you'll have hit the key during boot which causes your machine to enter "Setup" (often this key is the Delete key, but it varies from machine to machine). In the CMOS setup change the "boot order" so it boots from the CD or USB Flashdrive first (it will only boot from a CD if the one in the drive is bootable, most aren't so leaving other CDs in the drive won't cause problems in the future).
On other machines pressing a special key as it starts up will take you to a Startup Menu that let's you choose the boot device. On some new Windows 8/10 machines the only way to choose the boot device is to go the settings charm and choose PC Settings and Update choose Recovery and then Advanced Startup. Get someone to help you figure how to get your machine to boot from the Recovery Media (either Disc or USB Flash Drive). Once you boot from the Paragon Recovery Media you'll see this menu:
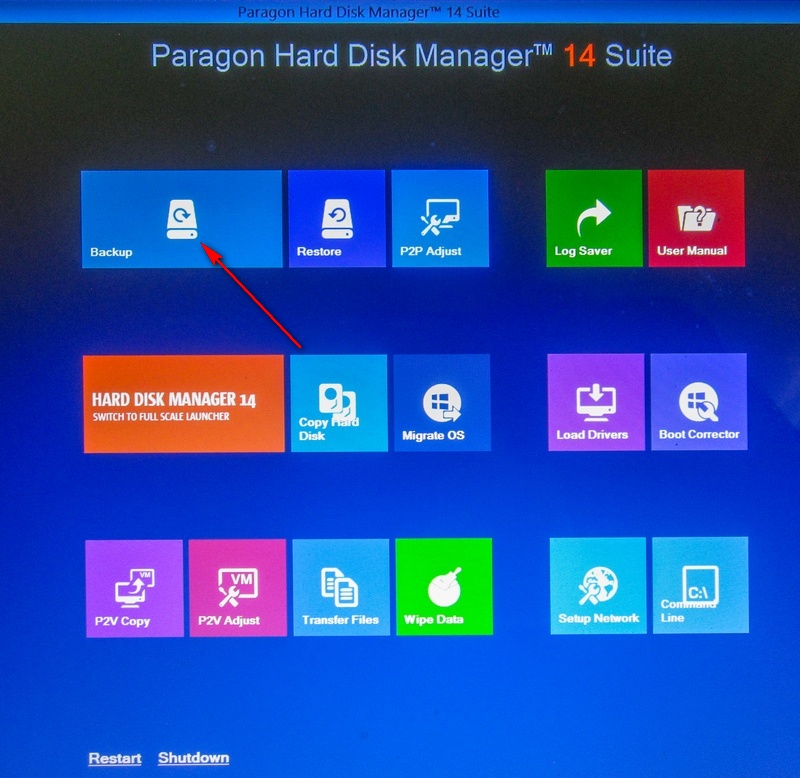
Compared to the 8.5 version of Paragon, this one takes longer to get started because it is starting a stand-alone version of Windows from the CD instead of just a DOS like environment, but the backup is MUCH faster because of the windows drivers which properly handle all the new interfaces and drives. Click on Backup (above).
Note: Usually after this point there are no noticeable delays going from screen to screen. However, on some machines I've seen delays of as much as 5 minutes while it analyizes the hardware, just wait.
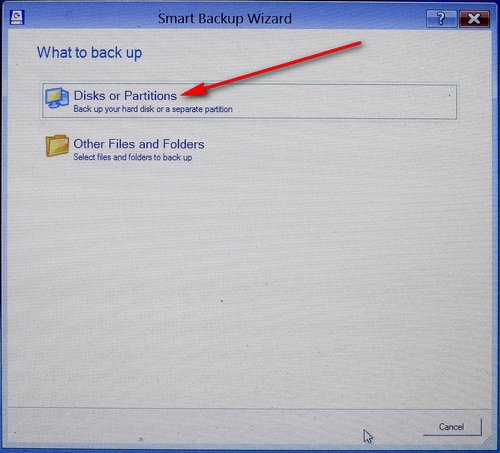
Finally you'll see this screen and you can finally click on "Next":

Since we want to backup an entire drive, click on "Disks or Partitions" (on one machine I also saw a long delay after this screen):
At this point you have to choose which drive you want to backup. This is an example of backing up a laptop with a 750GB hard drive divided into two partitions, C and D. The primary drive ususally, but NOT ALWAYS, shows up at the top of the list. Clicking on the little box next to the plus sign checks ALL the partitions on that drive. Usually you'll want to back them all up, but in this case I might un-check the D partition since it only contains data I backup up using SyncToy. If you have a D partition it might be the recovery partition and after backing it up once, you might choose not to back it up in the future to make the backups smaller and much faster. If you have a recovery partition you might want to back up just that partition in a seperate backup which you keep.
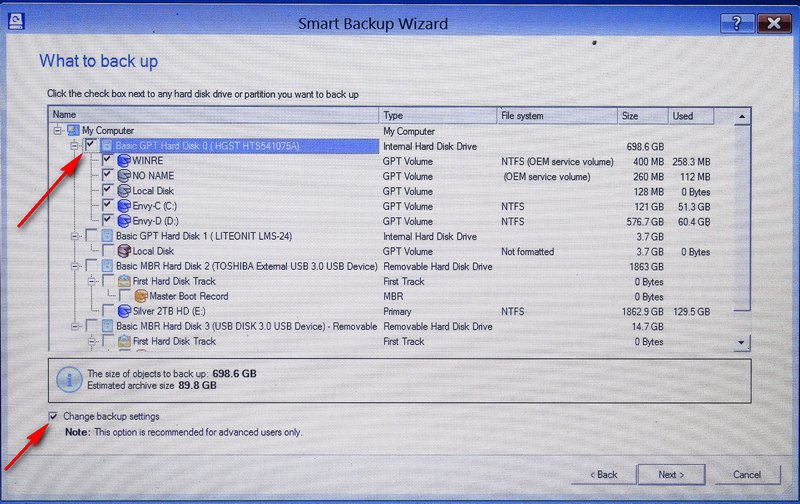
In the example above, the second "drive" must be 4GB of internal SSD memory used for faster swapping. The third drive is a 2TB external drive made by Toshiba. The fourth one is the 16GH USB flash drive I used to book from (instead of a CD, because this laptop has no CD drive).
Here's another sample of a machine with four internal drives, they are highlighted in yellow. It shows you their size (the 160GB drive is 149GB after formatting, the 1.5TB drive is 1397.2GB, and the two 2TB drives are each 1863GB after formatting). Note that the labels on each drive are highlighted in pink. Also note that the drives are not necessarily in the order you see them in Windows. WARNING: Drive C may not be first. Here the drive I labelled F is called E: and is listed before the drive I labelled E but is called F: here. Once you find the drive you want to backup click on the top level box (top arrow):
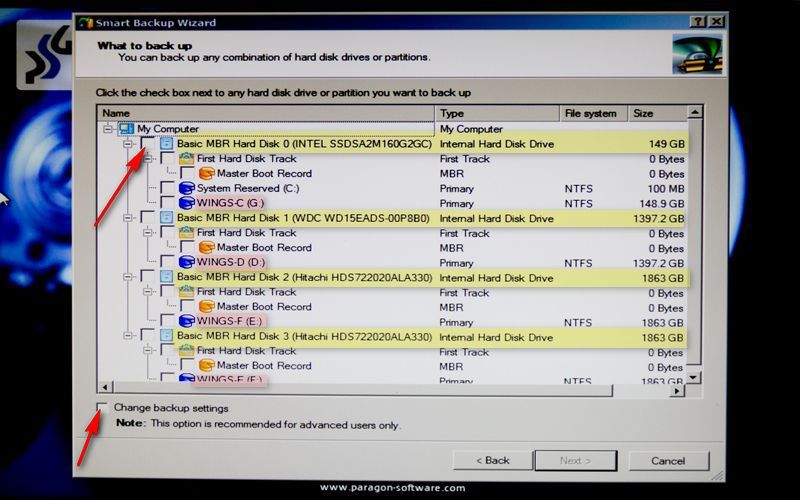
I also recommend checking the "Change backup options" box (bottom arrow in both screen shots above). Click on Next and you'll see this screen:
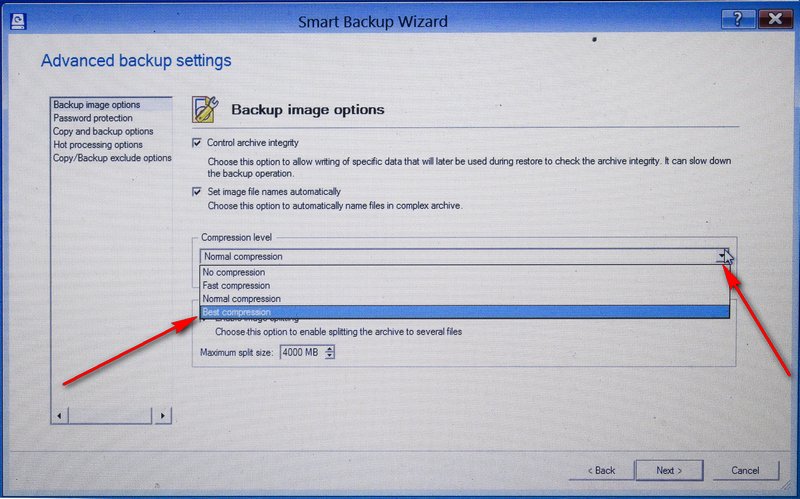
If you checked "Change backup options" I recommend changing "Normal Compression" to "Best Compression" using the pull-down as shown above. Then click on Next.
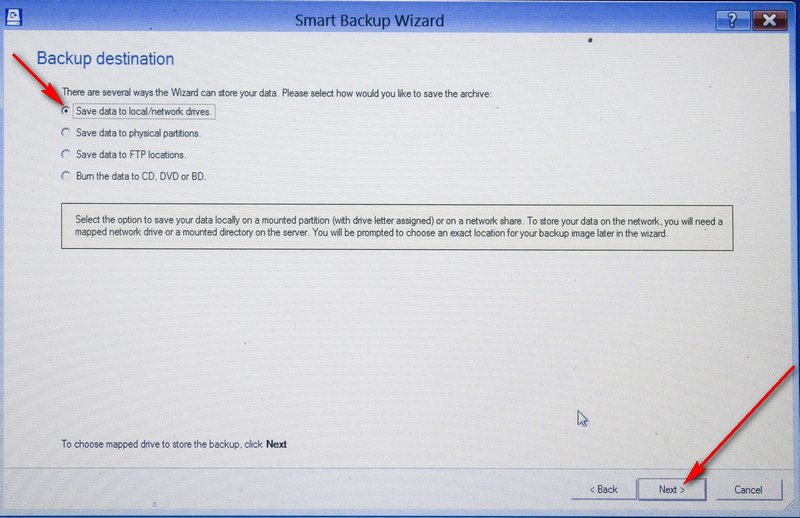
You want to save your data to a local or network drive which is already clicked, so just click on next:
Next you need to identify the folder where you want to put the archive and specify a name for the archive. Click on the +'s next to the drive and any upper level folders where you want to put the archive. In this case my external drive is labeled Silver 2TB HD:

Be sure the folder where you want to create the archive is highlighted the "#Silver-2TB" folder in this case:
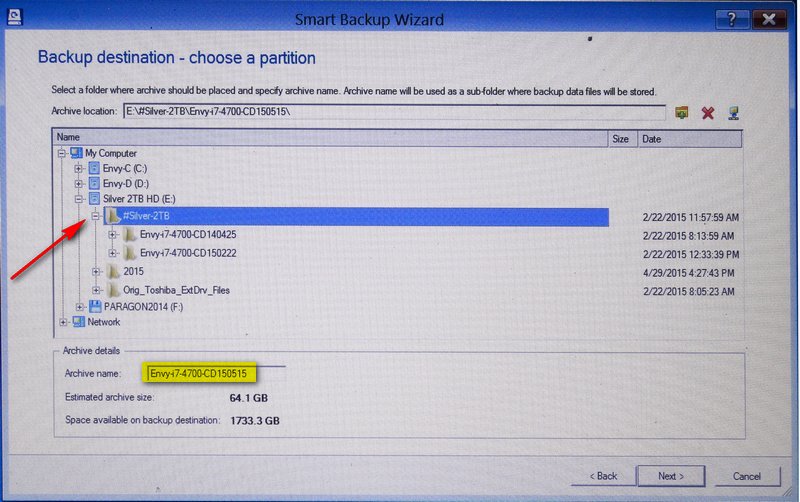
Here you see I've typed the name of the archive where it says "Archive name" Note that I like to use the name of the machine followed by the processor type, then the names of the Partitions in the backup and the date in YYMMDD format. I use this format so when sorted by name, the backups sort in date order. Paragon is going to create a new folder by that name where it will store the archive, see at the top where it says "Archive location" how it has filled in the path based on the name you typed. Also note that the estimate of the archive size now reflects the estimated compression.
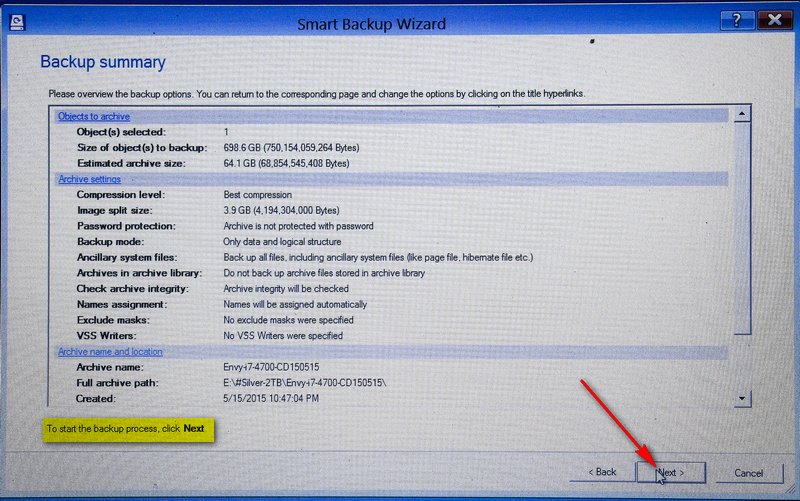
After checking that the Archive Name and Location are correct, click on "Next" which will give you a screen where you can add a comment describing the state of the machine when you made the backup. For example, "Before Windows Updates", etc. Once you click on Next again you'll see this final summary of the update.
Once you click Next (above) the backup starts. If you click where it says (Show/Hide) Operation Details (arrow below) it will show you more details about what it is doing.
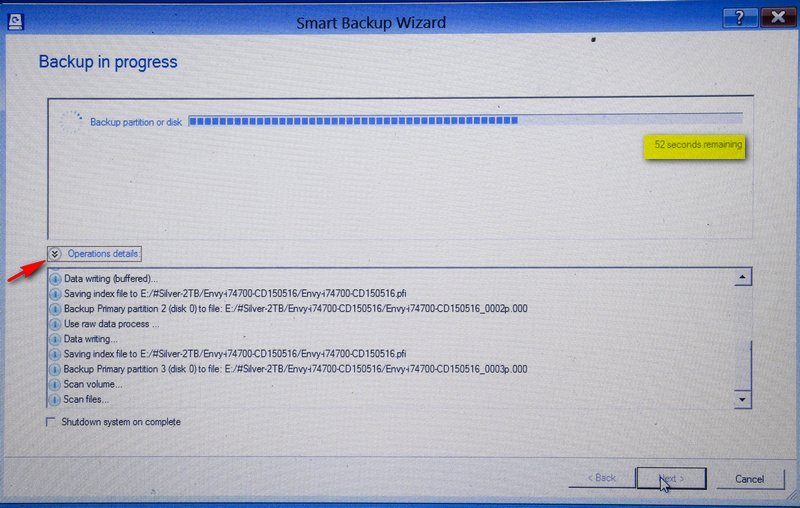
Don't get excited about the amount of time it shows remaining (52 seconds above). It's going to go up. Even on a machine with nothing but system software on the drive (no user data) it's still going to take 20-30 minutes or more.
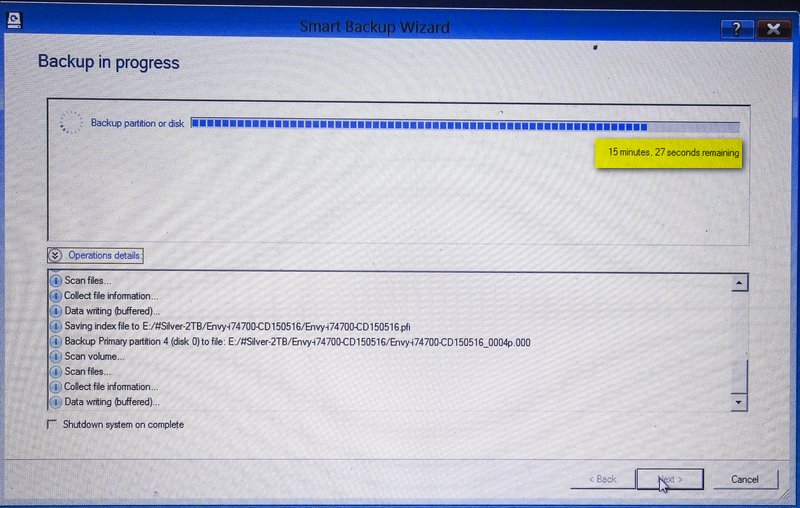
Here you see the time remaining has gone up to 15 minutes. If it's a laptop with a lot of pictures and music on the drive as well as the system software it may take 3 hours or more. Once you're well into the backup, the time remaining becomes more accurate.
Finally you'll see the screen that (hopefully) says the backup was completed successfully. Click Finish.
You'll finally be back at the first screen shown above. Take out the CD (if you booted from one). Then on the bottom-left of that screen click on either "Restart" or "Shutdown".
After rebooting, I like to go look at the folder where I've created the archive. There you'll find three small files, one with a .PBF extension and two with .pfm extensions. In addition you'll find a bunch of 4GB files with extensions like .000, .001, .002, etc. which contain the actual archive ... it's broken into files like this so they can be moved to DVDs should the need occur. This whole folder can be moved anywhere, should the need arise.
All in all, I've been very happy with this new version. Since a complete backup is faster, you should now consider doing one more often or after you've added new software that took a while to configure and are happy with the way the system is working.
Should you ever need to restore the backup, just boot from the same Recovery CD and choose "Restore" instead of "Backup" at the start. If you have any doubts about what you're doing get help from someone who's restored a system before.
Click for a two page Summary of the Backup Steps that you can print.
Suggested next choices:
ImagingTips.com Site Map
[an error occurred while processing this directive]